Comfort and Joy! Getting Creative with Cuddle Fabric Panels
Tis the season to be Jolly …….. and to share Comfort and Joy with everyone around us! And what better way than with a ‘comforter’?
Did you know where our company name, the McKay Manor Musers, came from? Well, let me tell you – when we lived in Vancouver, we referred to our house as the McKay Manor – and a Muse is someone who inspires you to be creative, so our mission is to inspire creativity in you. So … how creative can we get with a fabric panel? Let me count the ways.
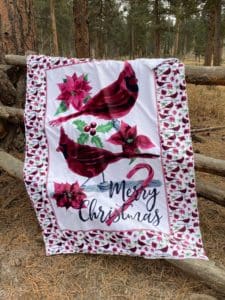
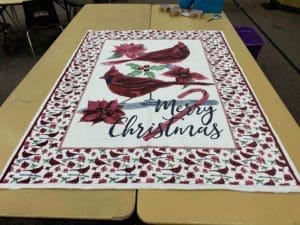
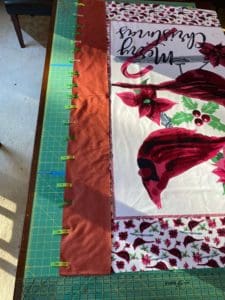
Shannon Fabrics has a digital cuddle panel featuring two beautiful red cardinals with poinsettias and holly and the text ‘Merry Christmas’ as the focal point. The panel is 45” wide by 58” tall. Here is a picture of the panel.

One of the first patterns we designed was called Six so simple baby blankets. The good news is that once you know the technique you can apply it to any size blanket. Here is a link to that pattern on our website.
Follow along as I create a blanket using the Cardinal Merry Christmas panel and some of the techniques in the pattern.
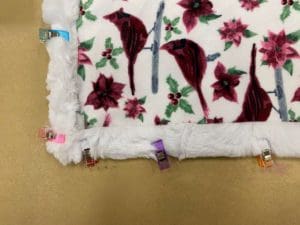
- Quick Sew and Turn – this one needs two coordinating pieces of fabric exactly the same size. I cut off the selvages from the panel, and then cut the backing to be exactly the same size. I put right sides together, then stitched around the outside edge, leaving a hole big enough for my had to fit through. I reach inside and turned the blanket right side out – slip stitched the hole shut and then top stitched around the outside edge.
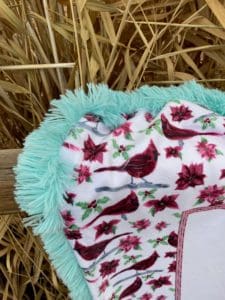
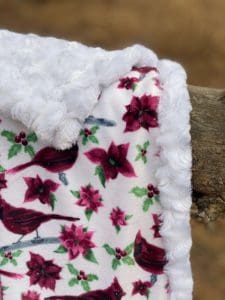
- Textured Edge – this one used a 3” strip of some type of textured fabric around the outside edge of the blanket. My favorite fabric for this is Shannon’s Shaggy Cuddle. You just need to cut a 3” strip of this fabric that will be long enough to go the entire perimeter of the blanket. We have a YouTube video to show you how to put this one together – just click here.
![]()
- Perfect Piping – this one uses a 2” strip of some type of cuddle fabric around the outside edge of the blanket. I love using texured cuddle fabrics but you can also use the cuddle 3 fabric – it comes in LOTS more colors in case you are trying to match a specific color that is in your primary fabric. We also put together a YouTube video to show you how to be this one together – just click here.
I can’t believe I forgot to take a picture of this one before I gave it away – It had the same panel of course, but I made the piping out of a textured grey fabric and it was so pretty. So … just so you can see what the piping looks like – here’s a picture of a different blanket with the piping edge and the kit that goes with it – The ballerina blanket makes a great gift for new little girls – I just made one for my niece’s new little girl. You can get the kit by clicking here.
![]()
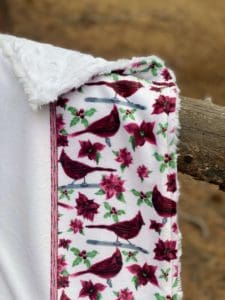
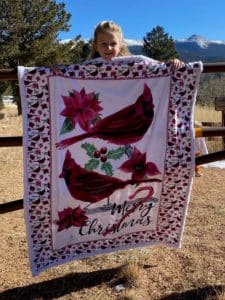
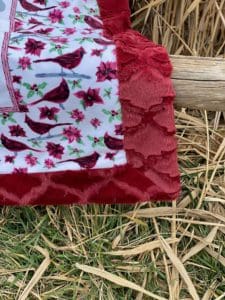
- Self Binding Backing – this is the technique I use for almost all of my more traditional quilts where I use cuddle fabric as the backing. The backing is cut 2” bigger that the front – height and width. For this blanket – the cardinal panel is 45″ x 58″ so I cut the backing 47″ by 60″. This time you sew the two pieces with the right sides together, then ‘miter’ the corners from the inside – then turn it right side out, slipstitch the hole shut and then stitch in the ditch around the outside edge. This is a picture of my adorable granddaughter Rozzie holding the blanket up at Mueller State Park – with Pikes Peak in the background.
5. So Simple Blanket – this is a separate pattern – click here for this pattern – but uses the same technique as in #4 above. This time instead of having the back be 1” bigger all the way round the front – you can have it be a different size – in this case I made the back 14” bigger than the front – so I had 7” sticking out beyond the front on all sides. This is one of my favorites because the warm cuddly red fabric extends round the edge of the panel. Click here if you would like this pattern.
![]()
I asked Kayla to come out and help me photograph the blankets – and her cute little son came with us – and they had a bit of a blanket party with this one – I just love how the soft cuddly fabric rolls from the back to the front of the blanket – and so do they!
![]()
And here is my oldest granddaughter – Gabriella – snuggled in the blanket I made for them – on Kira’s cute front porch.
![]()
There are two techniques in the pattern, that I didn’t use around the panel – the ‘Ruffled Edge’ and the ‘Hooded Blanket’. My favorite fabric for the ruffed edge is satin. If I had been at my sisters’ house where she has a sewing machine that ruffles the fabric automatically – I would have made that version as well. The hooded blanket just uses at 12” square of fabric in the corner of the blanket – and it probably works better for little people.
Two Additional Options – Just in case you didn’t have enough ideas!
- Wrap the back to the front and sew it down!
There is a really simple technique that isn’t in the pattern that I used a LOT – just the ‘wrap the back to the front and sew it down’. It is the easiest technique of all.
Just cut the back exactly two inches bigger than the front. In this case the panel was 45” x 58” so I cut the backing to be 47” by 60”. I put wrong sides together and the back extended one inch beyond the front all the way around the blanket.
I folded the backing to the front and used my Clover Clips to hold them in place –
Once you have it all clipped – make sure you miter the corners – and then you just need to zig-zag it down all the way around the blanket right next to the raw edge of the cuddle fabric. Because Shannon Cuddle fabric doesn’t fray – you can just zig zag right on the outside edge – no need to roll the raw edge under.
Some ladies from my church help me put together blankets for CHOICES – a pregnancy center here in Woodland Park – They gave a blanket to each of the new moms as they came in for their appointments in December – we hope this brings a little comfort and joy to them!
![]()
2. Adding a colorful border
And now for one more idea – you can add a colored border around the panel. This time I just added a 7″ border to both sides and then a 7″ border to the top and the bottom. I made one version with a red border
and one version with a green border – so much fun to be creative!
![]()
Tips for sewing with cuddle fabrics
We have updated our handout with our sewing tips for working with soft fluffy cuddle fabrics. You can click here to go the the blog and see the tips – and if you look at the “highlighted” text there is a place to ‘click’ to download a pdf version of the tips.
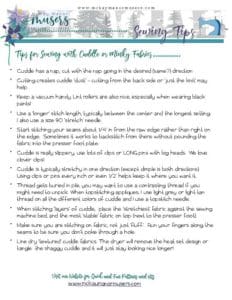
Two of the tips that are REALLY helpful to use when sewing cuddle or minky blankets are:
- Cuddle is extremely slippery and tends to want to move – make sure you use LOTS of clover clips – or long pins with really big heads to hold the fabrics together the way you wanted them to be held together – use one about every 2 inches.
- When stitching ‘layers’ of cuddle, place the ‘stretchiest’ fabric against the sewing machine bed, and the most ‘stable’ fabric on top (next to the presser foot). I forgot this one time – and my fabric really shifted as I was sewing it (even with all my clips) and I had to take it all out and try again. because I KNEW I had cut them the right size to fit together!
I hope this gave you lots of fun ideas to use your Cuddle panels to put together soft, fun blankets!
We wish you a very Merry Christmas and a Happy New Year!
I want to leave you with a music video of my favorite Christmas song from one of my favorite singing groups!
Hope you enjoy it.
Mary Did you Know? from the Pentatonix Christmas Album
https://www.youtube.com/watch?v=ifCWN5pJGIE&ab_channel=PentatonixVEVO
Sheila


0 Comments